 Loved doing this in class today. This tee pee style is a Claire Rowlands way of making it....it couldn't be more simpler :)
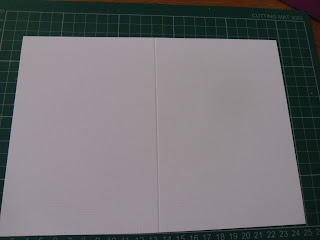
I began with a piece of card 9" x 6 1/2"
I then scored it at 4 1/2" along the 9" side, to fold in half.
 With the fold at the bottom, and the open ends at the top, measure 4 1/2" along the top, and put a pencil mark on the open edges. Repeat this along the bottom, folded edge.
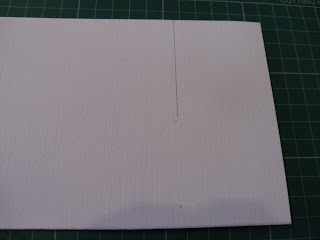
Use a ruler to line up between these two marks ......
.....and draw a line 2 1/2" down from the top.
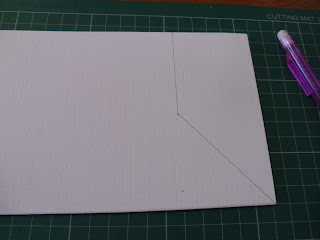
From where this line ends, join up to the bottom corner.

Remove this section.

Open out.

Score from the centre fold line at the top, down to the outer left point. Repeat to the right side.
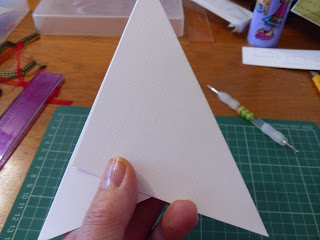
You will now be able to fold it into the tee pee shape.
 Next cut the decoration papers. You will need :
2 of 4 1/4" squares
1 or two (if you want different papers) of a 5 cms square....this will allow you to trim a slither off if necessary.
 Cut them in half diagonally.
Arrange the pieces how you would like them (any wording or directional patterns will need to be considered for when the tee pee is closed up. Trim any slithers off as necessary. Glue in place.

In it's folded position, you can overlap in either direction, punch a hole where you want your ribbon to come out....outer layer only. Then with a pencil, draw through the hole to mark the layer underneath.

 This next hole needs to go through the next two layers...which hopefully the folded position is obvious from the photo on the left. If you can't punch through both layers at the same time, punch the first hole and draw through as you did in the previous step.
Fold up.
 Thread
ribbon through, and if you wish any embellishments e.g. bells, charms
etc., and a greeting. Alternatively the greeting could be added to
another face of the teepee.
 I stamped a picture I wanted to put on it. As there were parts I didn't wish to cut off, I firstly marked in pencil where my die was going to cut, marking both the outer and the inner circles. I cut around the overhang (stocking and candy cane) to just past the inner marked circle. This allowed me to lift the overhang, over the top of the die so it wouldn't cut through these parts. This is how it looks after cutting, with the die still in position.
I also cut a slightly larger, decorative mat to frame the picture....
....coloured it in....
....and fastened it to the front of my card. Et voila :) See the photo at the top
Christine
I know I promised I would leave Christmas cards alone for a while, but the Thursday craft group wanted to revisit the resist technique, and this was as simple as it gets.
I began by stamping a variety of snowflakes in a rough 'band' across the upper part of my card, using a versamark ink pad, and heat embossing in a clear embossing powder (white powder is also ok to use) .
 I then added low tack tape to mask off the area I didn't want to ink....creating that 'band' of colour.

I used three different Distress inks randomly swirled across the embossed snowflakes (which are providing a resist to these inks).
Remove the tape.
Now to remove the resist. You will need a hot, dry iron and a clean sheet of copier paper, which will soak up the melted embossing powder. Put the clean copier paper over the stamped images, and press the hot iron over the top.
When you lift your iron off, you will see the copier paper has soaked up the melted images. Look at your card, and make sure that all the embossing powder has been removed, leaving the base white card where the snowflakes were stamped. If you need to repeat the iron process, make sure you use clean paper otherwise what you have already melted could transfer to another part of your card, or the iron sole plate.
 I then over stamped and embossed a larger snowflake in a silvery white powder (bottom left), and added a greeting. I haven't yet trimmed, matted and mounted onto a base card, but you get the idea :)
Christine
 I fancied a therapeutic play so decided to do some journalling. I love Kate Crane's work, and this is similar to her style.
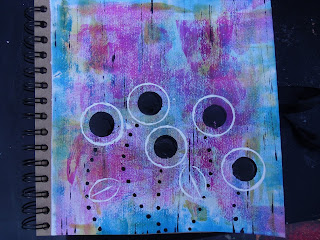 I randomly added colour, to what was a slightly textured heavy weight Kraft paper, but use whatever you like. I used a brayer to spread and blend the acrylic paints *** keep cleaning your brayer in between with wet wipes ** I dragged a few vertical lines in black using an old credit style card. A couple of different sized bottle tops to start the flowers and leaves, and the end of a paint brush to make dots for the stems.
Black and white pens were used to add finer detail - loops, crosses, leaf veins, dots etc.
 If ever you are stuck on what to journal, or don't know where to begin, quotes always come in handy. Use a typewriter style font, and when you have printed them out, draw a rough (uneven) line around the words - or in this case as it was a long quote, I grouped several words together. Cut out, again not being too wworried if they are perfectly straight.
Cut out and add to your page.....Et Voila !!
Christine


 Cut them in half diagonally.

 This next hole needs to go through the next two layers...which hopefully the folded position is obvious from the photo on the left. If you can't punch through both layers at the same time, punch the first hole and draw through as you did in the previous step.
  Thread
ribbon through, and if you wish any embellishments e.g. bells, charms
etc., and a greeting. Alternatively the greeting could be added to
another face of the teepee.


