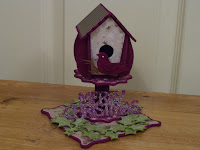
Today I thought I would share this fabulous Tando kit, that I took for the Thursday group to make a few weeks ago. The Tando kits are fabulous, being laser cut greyboard (some are MDF), and very easy to put together, even for a complete beginner. So I thought if I talked you through the process of how to decorate this particular one, you might be inspired to have a go yourself. Don't be limited though as the greyboard can be painted (even emulsion), inked and/or papered, and you could add a glaze,eg a crackle finish.
 I
began by drawing around all the pieces that I wanted to add paper mats
to. If you notice, on the second picture of the front, back and sides pieces, I
have continued the line where I had drawn around the slot, where they
will criss cross to make 3D when you put it altogether. This was
because, I felt it would be too fiddly to try and cut around the tabs
and slots, so decided these outer pieces of the bird house would be
simply painted. Then you will notice I have drawn a cutting line a
couple of millimetres in from the original line. It is important to draw a line (which you can easily erase until you are happy with it's accuracy) as trying to trim off a little freehand, will lead to wasted papers.
I
began by drawing around all the pieces that I wanted to add paper mats
to. If you notice, on the second picture of the front, back and sides pieces, I
have continued the line where I had drawn around the slot, where they
will criss cross to make 3D when you put it altogether. This was
because, I felt it would be too fiddly to try and cut around the tabs
and slots, so decided these outer pieces of the bird house would be
simply painted. Then you will notice I have drawn a cutting line a
couple of millimetres in from the original line. It is important to draw a line (which you can easily erase until you are happy with it's accuracy) as trying to trim off a little freehand, will lead to wasted papers.I then painted 2 coats of acrylic paint on all edges that would show, both sides, or the whole where necessary-I used Kaisercolour Magenta. ***SEE Do's & Dont's further down *** Cut out paper pieces whilst paint is drying.
I wanted to add sparkle to some of my elements. I used the DecoArt glamour dust, as this has a unique quality that will dry with the paint (you need to add it whilst the second coat is still wet and leave to dry completely before you shake off the excess). The alternative would be to use a spray adhesive when the paint is dry, and then add glitter. Trying to add using normal glue, will lead to uneven bumps.
 The only other decoration I did, which is completely optional, was to roll the dowel on an inked 'texture' stamp (I used the Kaisercraft Script stamp, but on another one used the music, and one Thursday crafter used the crackle stamp. I also stamped the bird and the wing, just to give it some texture, and added a mini crystal for the eye (those that they use for nail art are a perfect size)
 Assembly is pretty straight forward, some of the larger kits do come with basic instructions and pictures, but the birdhouse is a simple one.
 DO'S & DONT'S:
DO-Draw around all pieces that you wish to add paper mats to, and apply a thin layer of PVA to attach them to the greyboard when the paint is dry, or ink the edges afterwards if you are not painting, when the glued mats are completely dry.
If using Glamour dust, paint the underneath 2 coats first, then add the glamourdust to the second coat of the upper surface, whilst the paint is still wet. Allow to dry thoroughly, between coats.
Remember to paint/ink all areas that will show when assembled, that are not covered in other ways.
DON'T-Saturate the greyboard (it is a paper product), or it will warp, or worse still, cause disintegration. A couple of thin coats of a good acrylic paint shoud be sufficient and reduces the likelihood of brush marks.
Don't hold pieces by an area that is still wet with paint. Acrylic paint is tacky by nature, and your fingers will stick to it, and consequently pull some of the greyboard surface away whilst you try and 'unstick' yourself.
And this was the original 'for instance' I took for the group to be inspired by. Completely different colours, gives it a completely different look...duh!!! .... nothing like stating the obvious ha ha ha!!!!
Stock is extremely limited, so don't delay if you are interested in making one, or indeed another of the Tando kits...they are filed under 'Things to Decorate' on the website www.divinecrafting.co.uk
Catch up soon, bye for now
Christine


No comments:
Post a Comment