As a continuation from last week , I wanted to extend the theme.

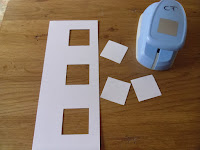
I began with a strip of card from an A4 sheet, approximately 20 cms in length. I used a medium square punch, but this time punched out three, one at each end and one in the middle.
 I used low tack tape again to anchor the stencil in place. This time I applied one colour to the top right corner, to about half way, diagonally. I used brushes, but foam is fine to apply your colour.
I added a contrasting colour to the bottom left corner, lightly blending together where the colours meet.

I used foam to apply more colour, to 'frame' the edge with the darker of the two colours.

Again, carefully remove your stencil.
Stamp images over your stencilled area. Don't be afraid to do multiples of the image, extending them if necessary.
Stamp a sentiment and cut mats, then mount onto your card. Another quick card that creates a fabulous effect. You could also tie some ribbon around the spine, if you wish. Don't forget to send me some photos of your creations.
Christine


No comments:
Post a Comment