Monday, 30 May 2016

Simple Scrapbooking - Embellishing & Layering

This is the final week I am going to focus on scrapbooking, as I have probably driven you mad by now, but hopefully given you some basic pointers if you are new to this craft.

Embellishments accent your pages and create further interest.  They can either be made or purchased already done for you....there are a wealth of ready made themed embellishments on the market, but don't feel you have to use them as there are many ways you can accent your pages for little, or no cost.  Among the snapshots I have included this week (apologies for the photo quality - I have taken them in artificial light), you will see a variety of embellishments. The first three have personal mementos - the birth card, wrist band, and my old Girls Brigade blazer badge.  You could use ticket stubs, a lock of hair, place card, etc. etc.

There are also buttons, pins, brads, and on the photos further down beads, buttons, cloth, wire and ribbon.  Also think about lace, wool and threads, jewellery etc...rummage through your junk drawer !!


Ribbons may be pre- printed...or personalise your own with either a fabric/permanent marker, or rub-ons.

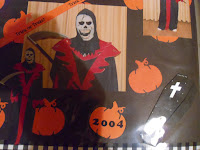


The coffin on this picture, was pre-bought, being appropriate to the theme.  The pumpkins were die cut.


3D stickers, give great dimension, as with the teddy in this photo, and the rattle on the top picture.


....and what about these sea creatures with wobbly eyes.


The bicycle and astronaut outfit were purchased embellishments - I wouldn't have wanted to start making these


 A few basic stitches, or even faux stitching (on the letters) add interest.


Rub-ons and vellum over the photos create dimension.

Borders can help to create depth, and tearing or cutting, then layering papers create texture and dimension.

The only aspect of scrapbooking I haven't touched on are the use of templates.  The stencil type masks are great for creating your own backgrounds with sprays, inks, acrylics etc., and even using pens to emphasise parts of the stencil by outlining.

The 'recipe' type stencils, where you follow a pre-designed layout, can be both a blessing and a hindrance.  They are useful, providing you don't feel you must create an identical page, as your photo/s might not be appropriate to do so, and/or, you don't have the necessary components to embellish your page as the example given.  If you are able to use it as a basis for your creation, but comfortable enough to make changes, then they can be a great aid to new scrapbookers.

So, to summarise....Always use acid & lignin free products to preserve your photos and treasure your memories for many years.  Do not be afraid of cropping the unwanted bits off your photos, and be ruthless about which ones you chose to use.  Cluttering a page with too many photos loses interest, so save the extras for a photo album.

Lay out your page before you stick anything down, so you have the opportunity to move things about before you do fix firmly in place.  Don't be afraid of leaving it if you aren't entirely happy.  Coming back to it a day or so later, may bring renewed inspiration.

PAGE THEMES: Special events (birth, marriage, engagement, retirement, reunions, anniversaries), Family History, Birthdays, Christmas, Holidays, Seasons, Travel, Shows & Sporting Events, School days, Family, Pets....etc. etc.

So hopefully after 6 weeks of blogging about it, you now have the courage to begin (if you are new), or the inspiration to expand your creativity if you are already a scrapbooker, and hopefully you've learned something along the way.  Feel free to share any further ideas you may have in the comments box below.

Christine.

Monday, 23 May 2016

Simple Scrapbooking -Themed Papers & Country Flags


Sometimes, you come across a perfect paper, that just captures the essence of the photograph you intend to showcase, and you don't need to do an awful lot to it, as it speaks volumes.  


This particular paper collection allowed me to recapture the 'moment', many years later :)....sometimes nothing changes ha ha !!!!


You will find papers themed for events and occasions  .....


......and places you may have visited......and much, much more.

With busy papers, you could extend the 'theme'.  Because this Christmas paper was so busy, I didn't want to add too much and detract from the photos.  I took inspiration from the paper, making a journalling mat in the same style obscure star shape, and punched some red dots to mirror the paper. Because there were stringy lines on the background, I also wrapped a fine silver thread around the star.


Creating a background of a country's national flag is another way or allowing your background paper to speak volumes, before you've even added anything.

....France......


 ......USA (and yes there are the correct number of stars) .....


....and China. I asked the girl in our Chinese take away to write China in their language characters (in the bottom right corner), and she was thrilled to 'help'. 

 So many more possibilities...so get cracking :)
Christine

Monday, 16 May 2016

Simple scrapbooking - Writing & Lettering


Writing is a huge hang up for most of us.  Very few of us actually like our own handwriting, and are very self critical.  It is memory keeping, however, and the way we write says something about us, and captures it forever.

To get around this, there are many different tools available.  A computer/ printer is a fabulous source.  Play with different fonts and sizes, even within your body of text....mix it all up as it creates great   interest.  

You could record important information, journal events (diary style)....or what about searching the internet for appropriate poems, quotes, word definitions etc.  Endless possibilities !!!!

And it's perfect for title lettering...All you have to do is cut it out, or transfer to your chosen paper/cardstock, and save the print out for templates.


You could use your stamps.  Letters and numbers are particularly useful.


It's definitely worth investing in a  die cutting machine.  These are a particularly useful tool if you intend to do lots of scrapbooking.  


But don't underestimate the power of your own handwriting.
 You can always print, as in the example on the left.  It's nothing special, in fact it's rather scruffy.........


........but.........
.......add a few 'dots' to the junctions/ends of each letter, and it's totally transformed.


Have fun,
Christine

Monday, 9 May 2016

Simple Scrapbooking - Geometric Shapes

 You can use any geometric shapes to create your scrapbook backgrounds or accents.  I am going to focus on squares for the majority of this weeks examples, simply because they are the easiest to cut, but by no means be limited, as an abundance of different effects can be created using a variety of geometric shapes, and even mixing them, as we did last week to create the sun.  The top page used a small square punch to create a mosaic tile effect in a variety of blue papers, both patterned and plain.  I used these to create a border, accent the corners of the photos and punch out the title lettering.  Although the odd letters, purely because of their shape, are more rectangular rather than square.  Don't be afraid to type your own things up on the computer and print out - letters, poems, quotes etc.

Sometimes less is more, and you don't need to add much to complete your page.  I used white squares with red lettering to mimic the 'L' plates...now torn up in the bottom corner.  The writing at the top are quotes I found on the internet, entitled 'Some Useful Driving Tips'.

For this particular page, I added the squares to fill in some of the blank spaces on the background sheet.  The top one done as a frame, placed at a jaunty angle and with some stamping in the centre, and the lower trio with button accents.  In fact this is a perfect example where there is no additional background, just the purity of the lovely water marked paper.

 For this page, I used larger squares to create an L shaped border along two of the sides, which allowed me the space to add appropriate words...again, no theme to the background....frames around the photographs and a few embellishments and stick on phrases is all that the photos needed.

Sometimes, you have only one or two photographs to showcase on a single page, and this is where you need to fill in some of the gaps.  Geometric shapes are a great way to do this.
Last week, the double page spread I shared, used punched circles, that were then stamped with circular letter stamps to produce the title.  This is another way of using circles.  When you select the papers you are using, cut a variety of different sided circles, and look for circular embellishments.  Overlap them in varying sizes, position so they go off the page, then trim to the edge, substitute them for the letter 'O' in the wording, use brads, buttons, thread through them....have fun.  The possibilities are endless.  Ovals would work in the same way, but then again, squares and rectangles in varying sizes could also be overlapped to create your background, instead of a theme.

What about hexagons?  You could do some patchwork on your background, or triangles - some pointing up and others down, to create a running border or a whole background sheet.  Some photos need very little fuss, as they speak volumes, where as others require enhancing to make your eyes understand the 'story'.

Have fun
Christine

Monday, 2 May 2016

Simple Scrapbooking - Themed backgrounds


There are many ways of showcasing your photographs, one of which is to 'theme' your backgrounds.  To me a holiday would always involve the sun, sea and sand, although I appreciate that there are those that like the 'white stuff' (arrrrggghhhhhh !!!!) and would class skiing as an enjoyable pastime - personally it would be my worst nightmare.

But for the purpose of this exercise, let's stick to the gorgeous yellow globe in the sky :)  For this particular page, I chose a neutral background.  When selecting papers, I either try to choose colours that are already in the photographs, or neutral tones that will allow them to simply be a background.  Using some plain yellow, I drew around a dinner plate and made some elongated triangles to represent the suns rays.  I cut a wavy background for the sand (a slightly lighter shade than the main sheet of 12 x 12), and a more pronounced border to represent the waves.  None of this has to be a work of art, as it is your background on which you are going to add your photos and journalling.  As I mentioned last week, there are very few photographs of myself when I was younger, so this one page covers four separate years.  I labelled, where appropriate, the particular years, information which fortunately was on the back of the photographs.  I used a 1/4" hole punch to add 'studs' in the corners of the photographs (using the same yellow as the sun), added the title on the wave border, a few purchased embellishments and a journal tag.  So if you aren't sure where to begin with a holiday themed page, perhaps you can give this design a go.  

Below are a few more holiday themed pages.


This is a double paged spread, again using a neutral background (dark cream), picking out the turquoise of the swimming pool and some candy stripes for contrast (otherwise the photos would simply merge into the background and get lost.  If you notice, I have done the opposite with the turquoise and the candy striped pieces.  If I have placed one horizontal on one page, I have placed that same piece vertically on the opposite page.  Thus creating a frame - two opposite corners.  I have accented with a darker brown - tied tissue paper for bows, and wetted and torn tissue paper to edge the candy stripes.  A title, some journal and other embellishment and accents...et voila !!


Now for this page, I took my colour scheme from the red hat and the swimming pool.  There are some fabulous scrapbook stickers that can add to your photographs rather than detract from them.  The centre photo on the left has a splash picture with the wording 'cooling off!', which perfectly sums up this particular photo.

This one has a pre-printed border top and bottom, of cute little divers, as that was the particular purpose of this trip.  The remainder of the background was a mid blue page with curved yellow pieces placed in opposite corners, under the top/bottom borders.  Now if I wasn't pointing this out, you wouldn't have noticed, which is why I said at the beginning, don't get hung up on it being a work of art.  It does add to the page, but it isn't the focal point, that's for your photos and journalling.  A few die cut fish with wobbly eyes, diving gear and lettering, some punched white circles, with light blue pen to make them look like bubbles, and the photos matted onto the various papers used, so that it all pulls together.

Stop by next week for geometric shapes instead of a themed background. 

Christine