 This is the final week I am going to focus on scrapbooking, as I have probably driven you mad by now, but hopefully given you some basic pointers if you are new to this craft.
Embellishments accent your pages and create further interest. They can either be made or purchased already done for you....there are a wealth of ready made themed embellishments on the market, but don't feel you have to use them as there are many ways you can accent your pages for little, or no cost. Among the snapshots I have included this week (apologies for the photo quality - I have taken them in artificial light), you will see a variety of embellishments. The first three have personal mementos - the birth card, wrist band, and my old Girls Brigade blazer badge. You could use ticket stubs, a lock of hair, place card, etc. etc.
 There are also buttons, pins, brads, and on the photos further down beads, buttons, cloth, wire and ribbon. Also think about lace, wool and threads, jewellery etc...rummage through your junk drawer !!
Ribbons may be pre- printed...or personalise your own with either a fabric/permanent marker, or rub-ons.


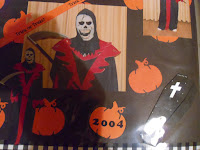
The coffin on this picture, was pre-bought, being appropriate to the theme. The pumpkins were die cut.

3D stickers, give great dimension, as with the teddy in this photo, and the rattle on the top picture.

 ....and what about these sea creatures with wobbly eyes.
The bicycle and astronaut outfit were purchased embellishments - I wouldn't have wanted to start making these
A few basic stitches, or even faux stitching (on the letters) add interest.
Rub-ons and vellum over the photos create dimension.
Borders can help to create depth, and tearing or cutting, then layering papers create texture and dimension.
The only aspect of scrapbooking I haven't touched on are the use of templates. The stencil type masks are great for creating your own backgrounds with sprays, inks, acrylics etc., and even using pens to emphasise parts of the stencil by outlining.
The 'recipe' type stencils, where you follow a pre-designed layout, can be both a blessing and a hindrance. They are useful, providing you don't feel you must create an identical page, as your photo/s might not be appropriate to do so, and/or, you don't have the necessary components to embellish your page as the example given. If you are able to use it as a basis for your creation, but comfortable enough to make changes, then they can be a great aid to new scrapbookers.
So, to summarise....Always use acid & lignin free products to preserve your photos and treasure your memories for many years. Do not be afraid of cropping the unwanted bits off your photos, and be ruthless about which ones you chose to use. Cluttering a page with too many photos loses interest, so save the extras for a photo album.
Lay out your page before you stick anything down, so you have the opportunity to move things about before you do fix firmly in place. Don't be afraid of leaving it if you aren't entirely happy. Coming back to it a day or so later, may bring renewed inspiration.
PAGE THEMES: Special events (birth, marriage, engagement, retirement, reunions, anniversaries), Family History, Birthdays, Christmas, Holidays, Seasons, Travel, Shows & Sporting Events, School days, Family, Pets....etc. etc.
So hopefully after 6 weeks of blogging about it, you now have the courage to begin (if you are new), or the inspiration to expand your creativity if you are already a scrapbooker, and hopefully you've learned something along the way. Feel free to share any further ideas you may have in the comments box below.
Christine.


No comments:
Post a Comment