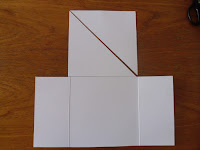


 I began with a piece of card A4 length x just under 15 cms (or 12" x 6"), and a second piece Just under 15 cms square (or a 6" sq). The larger piece needs to be scored to make a gatefold card. The smaller pieces need to be cut into two, diagonally.


Attach the two triangular pieces to the front 'gates', and trim. ***Keep the waste***
You should have something that looks like this.

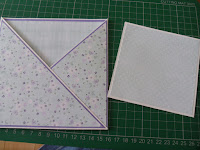
 Next I created some mats. You will need two squares of 5 3/4" (mine are purple) and two squares of 5 1/2" (mine are a check and a floral pattern). The inside square mat is pretty straight forward. Before you stick your diagonal mats, match up at the right angle point and reduce along the long diagonal edge, so that you have an even border all the way round.
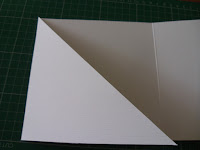
It doesn't matter which way you overlap your diagonal gates, but you need to secure your first side at the bottom, so that whatever you put in the pocket, doesn't fall out.


Attach one of your diagonal mats, then overlap the second gate, sealing at the bottom part only (see photo on left)

Attach the second diagonal mat, and you should have something that looks like this.
Now to be able to stand it up, you need to create a support for the back. Remember the 'waste' when you trimmed the gates earlier ? - score approximately at 1cm (3/8"), and trim a diagonal off the bottom, as shown in the picture below. If you trim a deeper diagonal, the card will tilt more - this is personal preference, but I would suggest you don't overdo it, as you can always take a little more off if required.
Attach by the scored strip. These are the side and back views.

I made a card for the inside 11 cms square (4 3/8") with mats cut to 4 1/8" & 3 7/8" squares. The smaller one I made using the same base white card, as I intended stamping a verse on it.
 For the tab top, I made this by folding some of the purple paper and punching the majority of a circle, so the straight edge towards the top was at the fold. If using card, you will have to make two matching tabs, otherwise you might ruin your paper punch. I then used my cutting mat to mark where I was going to remove. Mine lined up nicely with the 1cm marks, but you can adjust, depending on the size of your circle. I used the circle punch to remove these sections, lining up with the pencil marks.
I attached it to my insert, which I stamped with a verse, and also some pale inked flowers, as not to detract from the verse, just to add a subtle background and remove some of the starkness.
With the addition of a Magnolia figure, coloured in water colour pencils, and blended with a damp brush......Et voila !!
Enjoy,
Christine


No comments:
Post a Comment