For those of you who know me personally, you know that I
(a) Love all messy art and craft play - the messier the better
 (b) Want to preserve a legacy of memories, just in case I start losing my memory in my latter years, and also so future generations can get a glimpse into our lives in this time.
Now I am a scrapbooker, which is an ideal way of preserving and showcasing memories and photos, but I also love art journalling. It allows different channels to scrapbooking. It's more personal in a different kind of way......it's often more about 'what makes us tick' as an individual rather than capturing a memory or a moment in time. It has proved to be therapy over the years. For example, we were in a bad car accident some years ago, and even though the physical 'scars' had healed in time, a year later, the psychological scars were still very strong. It was almost as if I wasn't allowing myself to forget how lucky we were to have survived, that I was re living the trauma over and over again. Once I had journaled it, thus have a written record should I ever forget, I felt an enormous sense of relief and was able to move on. I haven't shared any photos of these, or other personal pages. We don't necessarily have traumas in life, or even wish to remember them. But I wanted to say that journaling can be about anything. It could be a quote or a saying...as in the two photos above, or, as
(b) Want to preserve a legacy of memories, just in case I start losing my memory in my latter years, and also so future generations can get a glimpse into our lives in this time.
Now I am a scrapbooker, which is an ideal way of preserving and showcasing memories and photos, but I also love art journalling. It allows different channels to scrapbooking. It's more personal in a different kind of way......it's often more about 'what makes us tick' as an individual rather than capturing a memory or a moment in time. It has proved to be therapy over the years. For example, we were in a bad car accident some years ago, and even though the physical 'scars' had healed in time, a year later, the psychological scars were still very strong. It was almost as if I wasn't allowing myself to forget how lucky we were to have survived, that I was re living the trauma over and over again. Once I had journaled it, thus have a written record should I ever forget, I felt an enormous sense of relief and was able to move on. I haven't shared any photos of these, or other personal pages. We don't necessarily have traumas in life, or even wish to remember them. But I wanted to say that journaling can be about anything. It could be a quote or a saying...as in the two photos above, or, as
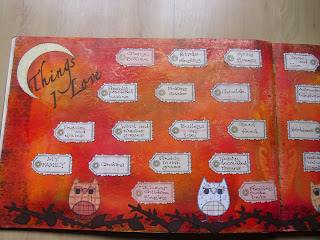 in the photos to the left something that makes you...YOU. These particular pages are things I love and things I hate (in other words things that make me 'tick'). This could be your favourite things, why you don't drink coffee or cringe at brussel sprouts. It could be some jounaling about being taken for granted by those around you - feeling like a slave, or perhaps the trials and tribulations of motherhood. Maybe you could journal about a star that you are in awe of (Marylin Monroe, Brad Pitt) or how a particular colour makes you feel.
 The possibilities are endless !! Have fun playing and creating backgrounds, with acrylics, watercolours, spray paints, watersoluble, crayons/pencils. There is no right or wrong and there aren't the usual constraints when producing pieces for cards etc. It is for your own purpose and pleasure. Once you've explored and created your background, start collaging on top. You could, if you are very artistic, paint your pictures in. If you don't have stamps that relate to what you are journaling about, look through magazines and incorporate them into your pages, even if you 'alter' them to add pizazz.
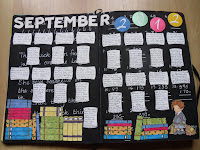
The photos below are a few from a FaceBook group I posted on each month, until two months ago when I simply was too busy to keep up with this. It's called Art journaling Calendar challenge 2013. It was started by Kate Crane of the Kathyrn Wheel some years before and moved to Facebook in 2013, but has not changed it's name due to FB regulations. Anyway, if you are new to journaling, this is a great way of getting into it, as it gives you a purpose and only requires you to produce a page once a month. There is lots of inspiration from the other contributors that will give you ideas. The idea is you produce a background and can theme it if you wish, to correspond with a particular month and year, and incorporate the correct number of sections where you can journal something that has happened on each of the days of that month. It's lovely to look back and read what you were doing 2, 3 , 4 or even 5 years before...even amusing at times, as it's surprising what you forget you've been up to and how quickly time has passed.


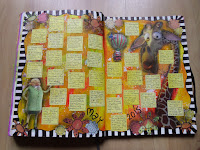
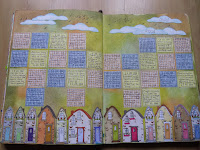
 Just a few of mine, playing with different background mediums, and collaging with digital images, magazine clippings, rubber stamps and even some painting and drawing. A variety of layouts, some themed for that month, others not.
The main thing is to have a go and enjoy what you are doing. It is meant to be a pleasure after all.
Just a few of mine, playing with different background mediums, and collaging with digital images, magazine clippings, rubber stamps and even some painting and drawing. A variety of layouts, some themed for that month, others not.
The main thing is to have a go and enjoy what you are doing. It is meant to be a pleasure after all.
Christine
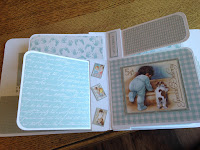
 I have, over the years made many different style flag books, but whilst browsing Pinterest, I saw a photo of a similar one to this, and decided to make some....and some friends have shared theirs too....so lots of photos today crafters. It is based on a design by Lori Coughlin if you would like to view her original one.....(http://DelightfulDesignsByLori.blogspot.com).
I began by cutting 2 sheets of A4 card (in their portrait position) to 15 cms wide. Then I trimmed one to 27.3 cms long and the other to 19.8 cms. The odd measurements are to allow for the bulk of the scored concertina sections, but still retain the same depth of the concertina folds. I then scored down the shorter depth of the longer of the two pieces. I joined them, as shown in the top photo. This forms the basis of your book.
Then I cut 3 of each size of the flags, 11 x 9.9 cms & 11 x 4.9 cms. Again, the odd millimetre shorter in the depths is to allow for the flags to open and close freely. The top, narrower flags I attached to the back face of the concertina folds, and the deeper flags were attached to the front face of the folds. This doesn't matter if you do it this way around, as long as you attach the upper ones to one face and the lower ones to the opposite face.
Then I made a belly band from the left over strips of the first two A4 sheets, joining a 5 cms piece from one to the end of the other strip (now covered by the flower) This was scored at 7, 7.5 & 23 cms. Decorate as you wish...you could add side or base pockets to the inside of the covers and add some tags. Embellish to your hearts desire...but simply have fun !!! Don't forget to scroll to the bottom as their are lots of photos for you today.
I have, over the years made many different style flag books, but whilst browsing Pinterest, I saw a photo of a similar one to this, and decided to make some....and some friends have shared theirs too....so lots of photos today crafters. It is based on a design by Lori Coughlin if you would like to view her original one.....(http://DelightfulDesignsByLori.blogspot.com).
I began by cutting 2 sheets of A4 card (in their portrait position) to 15 cms wide. Then I trimmed one to 27.3 cms long and the other to 19.8 cms. The odd measurements are to allow for the bulk of the scored concertina sections, but still retain the same depth of the concertina folds. I then scored down the shorter depth of the longer of the two pieces. I joined them, as shown in the top photo. This forms the basis of your book.
Then I cut 3 of each size of the flags, 11 x 9.9 cms & 11 x 4.9 cms. Again, the odd millimetre shorter in the depths is to allow for the flags to open and close freely. The top, narrower flags I attached to the back face of the concertina folds, and the deeper flags were attached to the front face of the folds. This doesn't matter if you do it this way around, as long as you attach the upper ones to one face and the lower ones to the opposite face.
Then I made a belly band from the left over strips of the first two A4 sheets, joining a 5 cms piece from one to the end of the other strip (now covered by the flower) This was scored at 7, 7.5 & 23 cms. Decorate as you wish...you could add side or base pockets to the inside of the covers and add some tags. Embellish to your hearts desire...but simply have fun !!! Don't forget to scroll to the bottom as their are lots of photos for you today.


 Christine


 This still falls into the realms of masking, but in this first example, we are masking an area to create a frame. Because you are stamping directly over the 'mask', this is best using thin copier paper, as the depth of card can cause the edge of the stamp to miss completely. I started with a piece of paper, reduced proportionally to the base card size, to ensure even borders.
 I also like symmetry so, you will notice I started stamping in the centre with my yellow inked flower, then worked either side to evenly space them. It is also important to rotate your work, so you are stamping the same part of the stamp at the same angle...otherwise it will just look a random mess. I managed three flowers on the long sides and two on the short sides. I hadn't worked this out before hand, it just happened :) I continued in the same manner, using differnt stamps and different colours. You can see to the left what the result was once I had removed my paper 'mask'.
 Now for this card, I masked off with tape as we did a couple of weeks ago, just leaving a strip in the centre free to work within. I used the same stamps and the same colours, randomly stamping until I felt it was filled enough. Don't forget to 'stamp off' the edge, and rotate your stamps to different angles. For all three of these examples today, all those minature stamps that you forget about, come into their own glory. So go and dig them out and have a play !!!
 This
final one isn't actually masked, but a reverse of the first frame,
edging and thus framing your card. I only made one change, and that was
a denser leaf stamp instead of the flower stamp in yellow. Again, I
like symmetry (although it isn't
a compulsory requirement) and I evenly stamped my images around the
card edge, making sure I rotated the card so I was working from the same
direction, and stamping off the edge.
This
final one isn't actually masked, but a reverse of the first frame,
edging and thus framing your card. I only made one change, and that was
a denser leaf stamp instead of the flower stamp in yellow. Again, I
like symmetry (although it isn't
a compulsory requirement) and I evenly stamped my images around the
card edge, making sure I rotated the card so I was working from the same
direction, and stamping off the edge.
Christine
There are an abundance of masks - also called mascils, stencils, screens - on the market. The ColorBox art screens are one of several varieties I stock, and I could have selected any of them to be honest. They are all fabulous to work with.
 You don't have to cut your card to size at the beginning, you might find it easier to work on a larger area and cut it down to size at the end. Make sure you secure the edges of your card to your work area, and also your mask on top of this. For this design, I had to carefully just catch the edge of the mask with tape so I didn't block any of the circular shapes.
Now this technique works well with pale, delicate pastels as much as rich, vibrant colours. It is entirely up to you how many different colours you want to use, I used four on this example, and quite random ones, I wasn't trying to compliment a particular colour palette.
 As always, start pale and try not to contaminate your Cut 'n' dry foam with other colours. In this instance - Less can be More - just lightly work your first colour in random patches, then do the same with your second colour in different areas.
Keep going until you have filled all area with your chosen colours, then remove your mask.
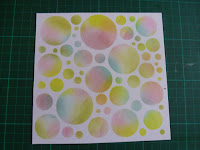
Sprays can be used with these masks, but experiment with working from a height ( to avoid heavy excess of colour) and a direct downward spray, otherwise the force of the spray could lift the mask if spraying at an angle, and bleed under it.
I chose the Paper Artsy JOFY stamps as they were 'rounded' and went with my background. It just requires mounting onto a mat and adding to a card, but not sure who the recipient is yet :)
Christine
This week we are using masking tape to block out strips of surface area. When using masking tape, or low tack tape, it is always best to tap it against your skin or clothing to remove some of the tacky so it doesn't tear the surface of your card when you peel it away.
You will notice, that by follwing the grid lines on my cutting mat, I was able to mask off in straight lines....always a plus ha ha ha !!!
 For this first card, I used two colours of distress inks. I favour these as they are dye based inks that blend really easily. Pigment inks can be very wet, although the Colorbox Cats Eye Chalk inks also blend fantastically. Work with your Cut 'n' Dry foam in swirling circular motions, starting with your lightest colour so you don't contaminate your foam with the darker shade. Make sure you work slightly over the masking tape, to ensure you will have a crisp and defined edge when you remove the tape.
 It goes without saying, peel your tape back carefully and slowly to avoid any surface tears. Simply over stamp with an image and a sentiment on the white. I'm sure you will agree, it's a striking contrast and easy to achieve.
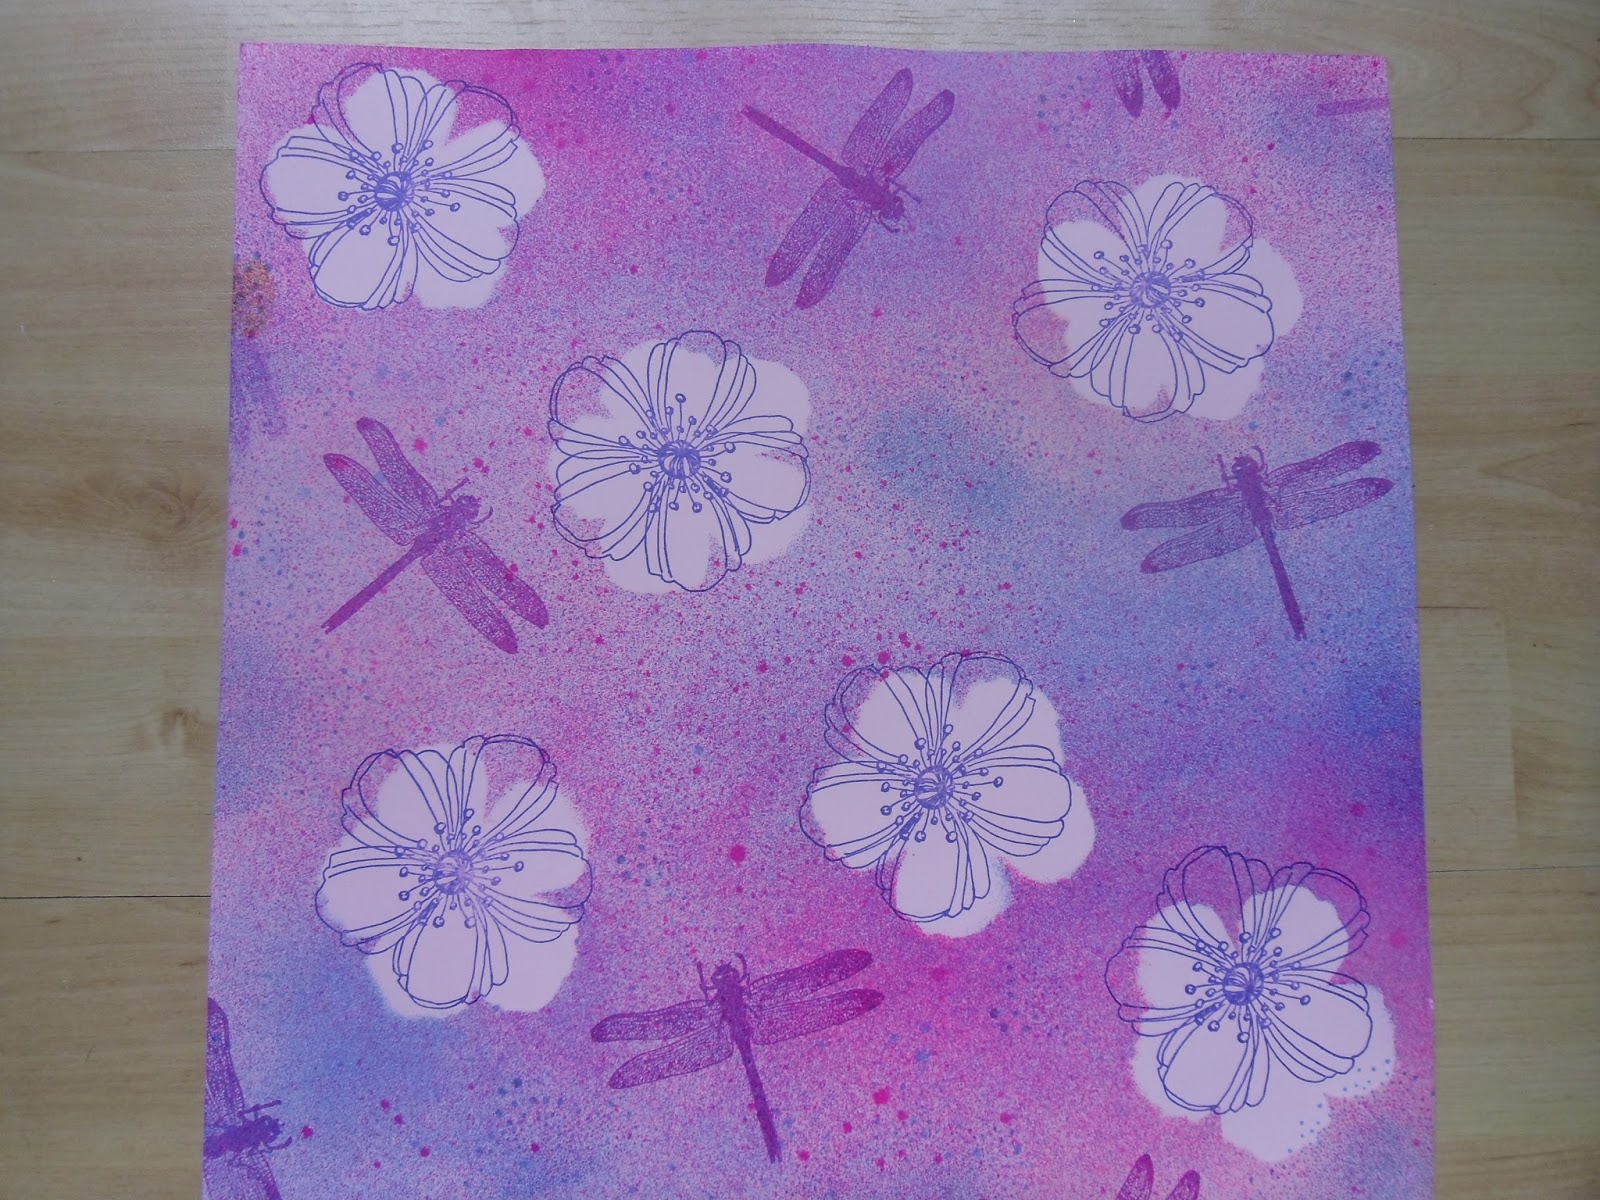
Now for this card I revisited Masking Techniques 1 (June 15th), firstly masking out the centre section, then stampng small dragon flies randomly in the top section, and covering with Post-It note masks. I then used spray inks to colour (but ink pads would work and give a crisper edge as the sprays can weep slightly under the masking tape). As I was using sprays, I flicked and splattered some of the colour, and also drips of black liquid ink, just to add interest and break up some of the white band. I then removed the masks and stamped another stamped dragon fly and a sentiment to complete the card.
Christine
It goes without saying, peel your tape back carefully and slowly to avoid any surface tears. Simply over stamp with an image and a sentiment on the white. I'm sure you will agree, it's a striking contrast and easy to achieve.
Now for this card I revisited Masking Techniques 1 (June 15th), firstly masking out the centre section, then stampng small dragon flies randomly in the top section, and covering with Post-It note masks. I then used spray inks to colour (but ink pads would work and give a crisper edge as the sprays can weep slightly under the masking tape). As I was using sprays, I flicked and splattered some of the colour, and also drips of black liquid ink, just to add interest and break up some of the white band. I then removed the masks and stamped another stamped dragon fly and a sentiment to complete the card.
Christine
Following
on from last week, and funnily enough, starting with the same stamp -
it is an easy one to cut out though - stamp and cut out several images.
You don't have to use Post-It notes if you you card or a heavier weight
paper, as the weight should ensure they stay in place whilst
spraying.
 Alternatively
you could you die cut shapes...and you don't have to stick with one
type, a variety of die cuts, or stamped images add interest to your
project. If you are creating a male themed background, why not try different sized and shaped cogs
or clocks ?
Alternatively
you could you die cut shapes...and you don't have to stick with one
type, a variety of die cuts, or stamped images add interest to your
project. If you are creating a male themed background, why not try different sized and shaped cogs
or clocks ?
 Using two or three colours of spray ink (I used the Clearsnap ones as they are beautiful and vibrant - available in the web shop), spray randomly in patches, from a height to make it 'mistier'. It is best to leave it to dry fully before removing the masks. If you are a little impatient, lift very carefully so you don't smudge your inks.
When it
has dried fully, over stamp in complimentary coloured inks. As I used
the stamp to create my masks, rather than die cut shapes, I used the same stamp
over my blank areas, intentionally off setting and slightly rotating the
stamp....I didn't want to just fill the space, otherwise I would have
done last weeks masking technique. I also added some background dots (chunks of script or a music score would have equally been as effective), and some dragonflies fluttering around the flowers.
The possibilities are endless - why not design your own wrapping paper/gift packaging with matching gift tag/card.
It doesn't have to be on a large scale, backgounds for cards, ATC's and book marks using smaller stamps work equally as well. Simply have fun playing !!!
Not sure why it has up loaded the same picture twice ????....probably computer gremlins.
Christine
This is another of my favourite techniques, and there are so many different ways to 'mask' which we will explore over the next few weeks.
For this particular version, you will need Post-It notes or similar self adhesive edged notes and to practise, a stamp that you will be able to cut out easily. Don't choose one with lots of fiddly cutting or fine wispy details that protrude from the main body of the stamp, or you may set yourself up to fail.
There is one basic rule: whatever appears in the foreground must be stamped first, masked, and the background is then added. First, stamp the foreground image onto your card (mine is the central flower) and also stamp the same image onto a Post-It note, making sure you catch part of your image on the sticky bit.
Cut out the mask, and using the 'sticky bit' to hold it in place, lay it over your original foreground image.
Now the mask has been created, you are ready to start building your layers to create a 3D effect. In this basic example, I am simply stamping two further flowers that I want to appear as though they are tucked behind/further back, than my main central image.
 When you remove the mask, you will clearly see that the central flower appears infront of the two either side.
I then simply painted mine with a water brush and some distress ink from pads, added glitter to the stamens, then mounted onto a complimentary coloured mat, which I also accented with similar colour ribbon around the card.
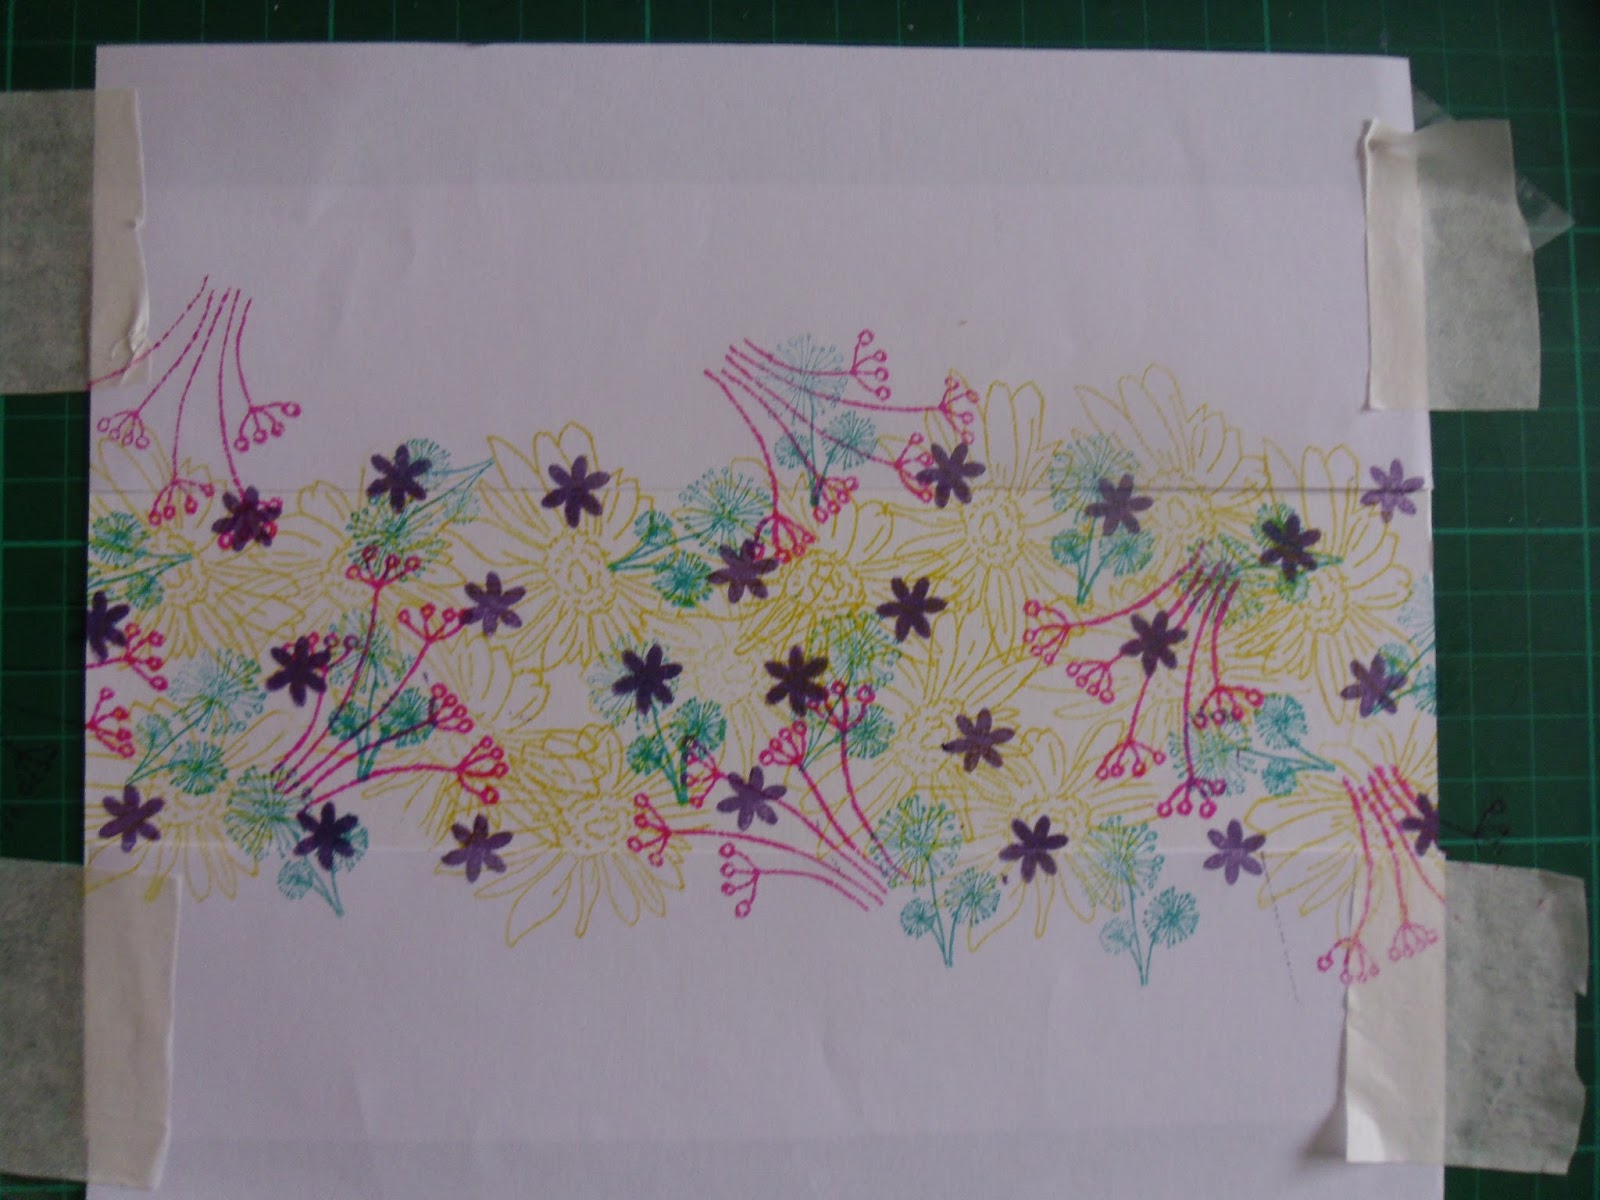
 Now
you have the hang of this simple technique, why not have a play with
other stamps. I have stamped a few more up below (although only on copy
paper to demonstrate to you what I mean - hence the few crumples !).
Now
you have the hang of this simple technique, why not have a play with
other stamps. I have stamped a few more up below (although only on copy
paper to demonstrate to you what I mean - hence the few crumples !).
 The first two are purely a character (the foreground) sitting on something (the background).
 In this one I played further using more masks, beginning with the girl and the front large pot to the left and the small one on it's side to the right
.
I then masked the left pot to add another one tucked behind it and then masked this and the small fallen pot whilst I stamped the cart. The pot on the cart and other small upright pot was stamped, and the one on the cart masked whilst I stamped a further two pot tops to create the effect that there was a stack of three......ooops!! .....not quite in line - please forgive me. I placed the masks back on the pots whilst I added some flowers. Voila !! So what are you waiting for ???? Come on - get MASKING :)
Christine

 (b) Want to preserve a legacy of memories, just in case I start losing my memory in my latter years, and also so future generations can get a glimpse into our lives in this time.
  in the photos to the left something that makes you...YOU. These particular pages are things I love and things I hate (in other words things that make me 'tick'). This could be your favourite things, why you don't drink coffee or cringe at brussel sprouts. It could be some jounaling about being taken for granted by those around you - feeling like a slave, or perhaps the trials and tribulations of motherhood. Maybe you could journal about a star that you are in awe of (Marylin Monroe, Brad Pitt) or how a particular colour makes you feel.
 The possibilities are endless !! Have fun playing and creating backgrounds, with acrylics, watercolours, spray paints, watersoluble, crayons/pencils. There is no right or wrong and there aren't the usual constraints when producing pieces for cards etc. It is for your own purpose and pleasure. Once you've explored and created your background, start collaging on top. You could, if you are very artistic, paint your pictures in. If you don't have stamps that relate to what you are journaling about, look through magazines and incorporate them into your pages, even if you 'alter' them to add pizazz.


 Just a few of mine, playing with different background mediums, and collaging with digital images, magazine clippings, rubber stamps and even some painting and drawing. A variety of layouts, some themed for that month, others not.


