Monday, 26 September 2016

Embossing Paste

This week I thought I would make some Christmas cards using  Dreamweaver products, namely the embossing paste and their metal stencils.  The metal ones are slightly deeper than the thin plastic type stencils, so give more dimension when the paste has dried.


I chose a silver embossing paste, and a dark coloured card as a contrast.


I attached the stencil using low tack stencil tape (this doesn't tear your card when removed), and made sure that it was firmly attached to my work mat.  I applied a layer of paste, making sure I had covered all the area and not missed any fine corners or edges.


I then used the scraper to remove the excess paste and give a flat, even surface.
I immediately put the residue paste back into the pot, wiped and cleaned the rim before closing, otherwise it will dry up and be wasted.  I also dropped the tools I had been using, into a bowl of warm soapy water to soak.  


I checked that the image had worked, by removing all but the top piece of tape, and using it as a hinge, I carefully lifted from the open edge to check the image was a good one.  If it hadn't have been, it is at this point that you can re tape and go over what you have done - providing you have used this 'hinge' method, to ensure the stencil goes back down in exactly the same place.  Remove stencil and immerse in warm soapy water until you are ready to clean the tools used.


It then needs to be left to dry fully, preferably overnight.  When dry, you will have a lovely raised surface design....one of those you cannot help but stroke :)

It's then just a case of mounting, whatever way pleases you.


Christine.

Monday, 19 September 2016

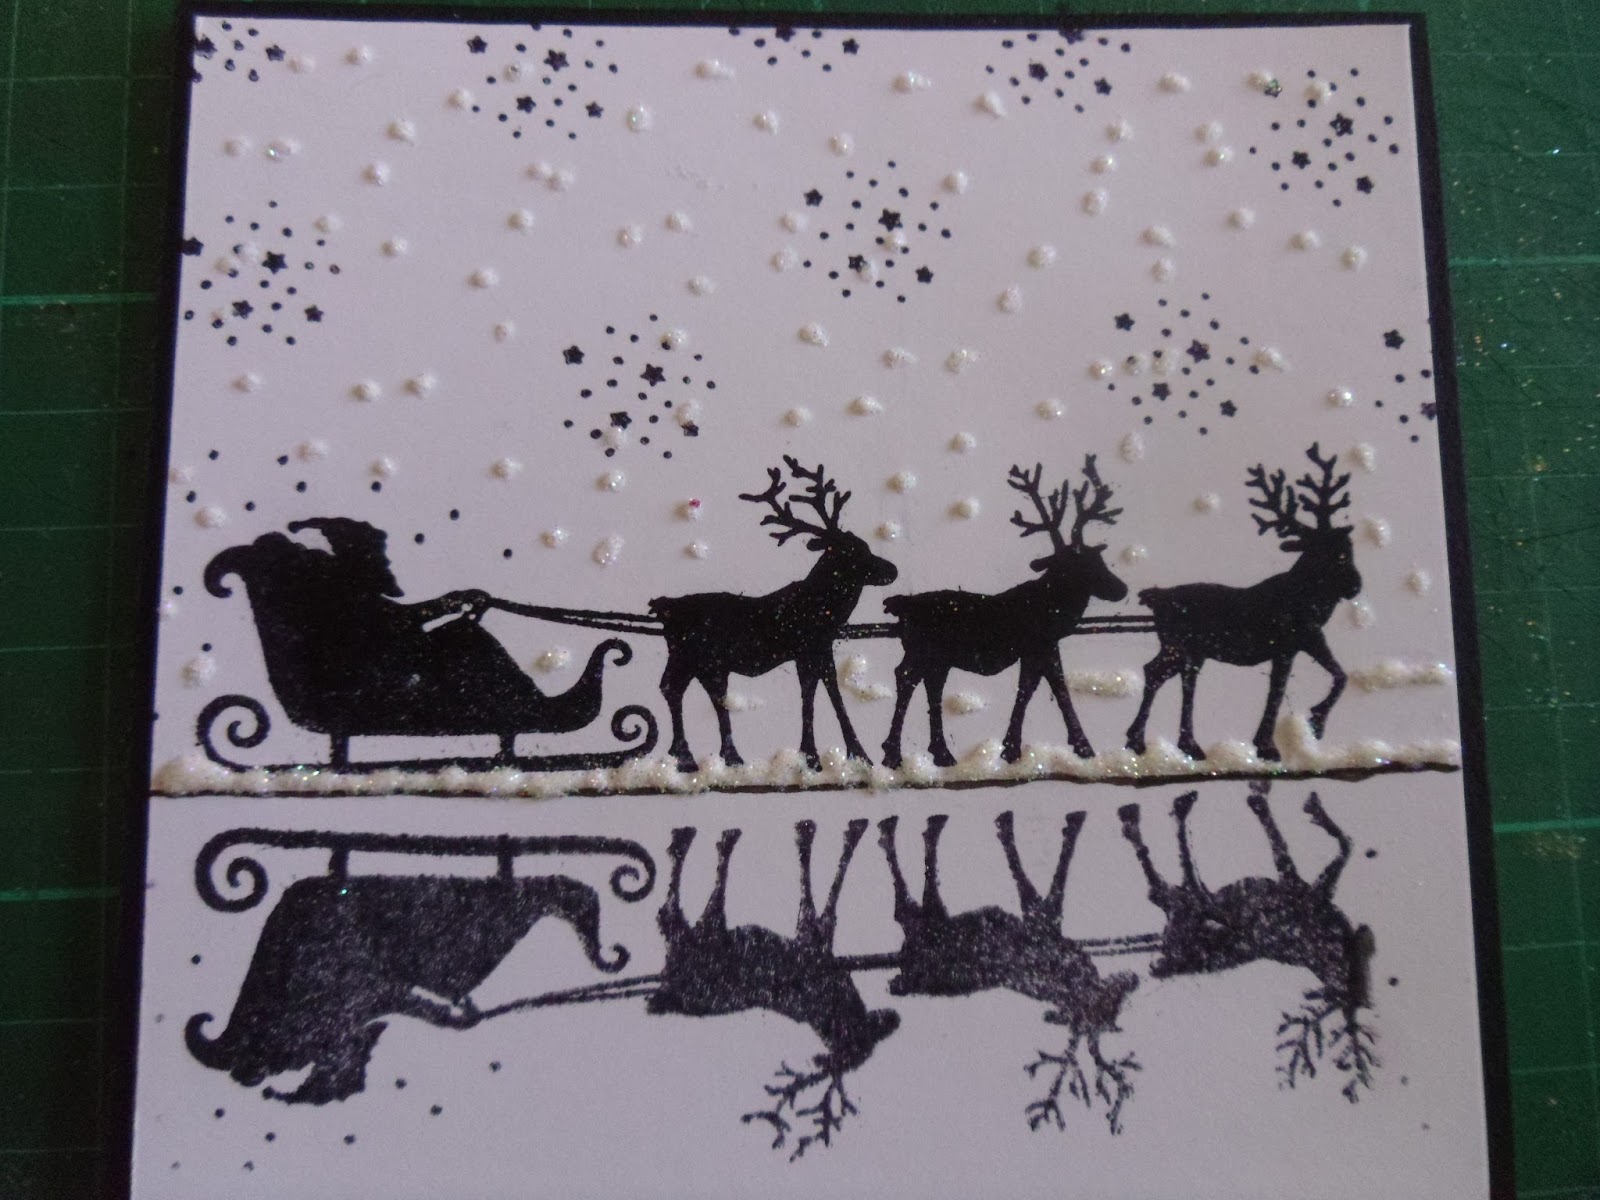
Reflective Reindeer


I love this technique, but it does take a little practice.


As we use a brayer to produce a mirror image (reflection) you will need to choose a suitable stamp that will fit around the brayer, without overlapping, otherwise it will not work.  Because we will be producing this reflection first, I like to position my stamp 'upside down' so that I can clearly see that I am doing it correctly.  Ink the stamp up really well - I used black Archival ink - then with a light pressure, roll the brayer over the top of the stamp, picking up the inked image as you do.  You will then need to transfer this image to the lower part of your card, remember 'upside down'.  *** Make sure you roll the brayer to the start point before you touch down onto the card to transfer this image, so that you start rolling from the edge of the design, in this example, the first reindeer, finishing with the sleigh.
It is also worth mentioning, that it is normal for this mirror image to be paler, a reflection in water or snow would not be as crisp.  CLEAN THE BRAYER WITH A WET WIPE.  Ink up the stamp again, and match up the design.


I then used a fine black pen to draw in the line between land and water, trimmed the excess card ......


 .....mounted onto some black card, and added some Glamour Dust for snow.  I love sparkle :)

As you can see from the finished card, I matted a few more bits, just to make it more interesting.  

I had wanted to use the same tree stamp as last week to show you this technique, but unfortunately it was just a little too long for the brayer. 
Christine

Monday, 12 September 2016

Christmas Forest

A very simple but striking card this week...just what you want when you have quite a few to make.  If you haven't got a stamp that has a collection of trees, perhaps you have some individual ones which you can use to make a scene, and perhaps a fine black pen to add some contour lines to the landscape...a few mounds, hills etc.

I simply stamped this in a black ink, along with a simple greeting.  Monochrome always creates something stunning.  I then used a fine nozzle PVA glue, as this is thick enough to hold it's shape and give some dimension, and sprinkled on some Crystal Glamour Dust (ultra fine glue).  I used the nozzle to trace under the contour lines, and randomly scribbled onto each of the trees.

When it had dried, I mounted the image onto some black card, tied some fine ribbon and bow around the corner that had surplus white card showing, fastening the ribbon behind the black mat, then mounted onto a card.  .

Christine

Monday, 5 September 2016

Christmas Poinsettia


This week I decided to use up some waste...we all have some, you know, those strips of paper that you've saved 'just in case'.  I have used a stamp from a Magenta set, which I felt leant itself to decoupaging.  


I stamped and heat embossed in a variety of colours - gold, silver, black, white, crystal sparkle....and I used all the waste strips.


I cut out one as a whole square, then for each, either one flower, or two if you want more dimension.


I slightly shaped the petals by rolling each petal over some scissor blades ***DO BE CAREFUL** 

As you can see, I simply matted the square onto a complimentary piece of card (the two shown are on a gold and a silver mat), and onto an A5 card.  I layered the cut out poinsettia flowers using silicone gel, the first I matched up to the base square, the second I rotated slightly.  I added a few glue dots to the centre and some tiny little bead/balls (which I always thought were called ballentine....but apparently not).  A few peel off words (that's two weeks running I have used peel offs to accent.....I must need a lie down),  and some more Christmas cards finished.
Christine


Monday, 29 August 2016

Christmas Caroller


Well last week's gingerbread house has certainly got me in the mood for getting a head start with Christmas cards.  Because we probably send more Christmas cards, than the sum total of all other cards during the year, they have to be fairly quick so they can be produced in multiples.  I tend to make a few special cards, and try and do 10-20 of each of several designs.  That way I get to use my abundance of Christmas craft stamps and stencils, and one design might be okay for your friend Sharon, but wouldn't be the right design to send to auntie Hilda.

This is just a 6" square card, but could be any size, with a panel of Christmas paper matted over a slightly wider panel of a plain colour.  I used a plain silver peel off border strip at the edge of the patterned paper where it met the plain.  You could punch a border.  I punched a circle, stamped a greeting, edged the circle and the card with the same colour ink, then made a hole to thread a little ribbon through.

I stamped a Magnolia figure and cut it out.  You will notice that I haven't cut on the line, but left a thin white edge.  This is ideal if you have something 'tricky' (eg. detail that might accidentally get chopped off), or if your cutting skills aren't spot on.  It's very forgiving and isn't noticeable, even if the narrow border is uneven.  I used ProMarkers to colour in the figure, as I wanted the colours to be bolder to reflect the paper.  A punched snowflake and a little card candi.....and ....well that's my cards started.

Catch you next week,
Christine

Monday, 22 August 2016

Gingerbread House

I wanted to share a new CandyBox Crafts kit that I 'requested'....as I intend teaching it for the November workshop.

I had two purposes for it.  The first was to sit on my Christmas dinner table, holding table gifts for everyone (I have dogs that don't like crackers, which is why I usually buy a small gift instead....better than the rubbish you find in crackers).  The second purpose was to fill it with sweets, preferably CHOCOLATE :), for the build up to Christmas.

 
It has been an absolute pleasure putting this together and decorating it.  I used Kaisercolour acrylic Mud Puddle, as I felt it was a gingerbread colour.  The papers were from the First Edition collection, Christmas Wishes.  In the kit were also gingerbread people, stars and candy canes...oh and little squares, which could be made into scrabble tiles to put your house name on.  I used them to make a few extra sweets....the glittery ones, like square fruit pastilles.
 
The stars, I simply painted and added some card candi...I thought they looked like smarties or skittles.  You will see the square pastlles (painted and glittered), and also some fimo sweets and candy canes I made.  The larger MDF canes in the kit, I papered, inked the edges and added some crackle glaze.  Two of these I used to frame the front door, which you will see in a later photo.

The window frames I painted white and added DecoArt crystal Glamour Dust to the second layer of wet paint.
 
 
I painted the path grey and used a stencil mask to create the path around the house.


And here are some of the table gifts inside :)

The label I draped around the chimney, happened to be something I took off a jar of marmalade, recently purchased at our local food festival (pink grapefruit and prosecco...mmmm)  I think the company was called Peckish, if I recall ?


I also found some letter stickers in my scrapbooking drawers, and I thought they looked a little like jellybeans, so I decided to use them rather than the square tiles to put our name on.
 There was also a tree in the kit.....fabulous value for money...or what ?!?!

I painted, papered and inked as I had with the house, and added card candi for baubles. I made the paper chains using quilling papers,


 This is a close up of the door with two candy canes overlapped to frame it.  The icing was done with liquid pearls and the handle was something I found in my craft stash.  You will notice I used some fimo sweets to define the path to the front door.

And look at these chocolates....alas they didn't last very long.  Unfortunately my waistline is expanding.


The gingerbread men were decorated with liquid pearls, enamel accents and Stickles.  I had intended using black beads for the 'currants', but once you start delving into your craft goodies, you find other things you feel would work better.  I also wrapped some small ring boxes for parcels under the tree.
This was enormous fun to make, and I will be using it year on year.

You should find most of the goodies in stock in the shop, or arriving very soon if you want to have a go.


Christine

Monday, 15 August 2016

Silver Wedding Card in a box


A number of weeks ago a young lady came to purchase some sheets of A3 card to make boxes to hold large cards she had made.  I suggested that she could actually make them from A4 with very little waste.  As I had a special anniversary card to make, I decided to share how I do this.  The lid of the box is the largest component, so this uses a full A4 sheet.  As my card was quite shallow, I only allowed 1 cm sides.  If you need deeper sides to accommodate your embellishments, then you will have to adjust your card to fit inside.... So, for the lid, I scored all sides with a one cm margin, cut two semicircles on the long sides (lid only - to allow you to lift the lid off easily), then removed notches, in order to turn in and hold the box shape.


I glued these tabs, fastening them to the opposing sides, and holding with clips until fully dry.

The base is made by the same method (minus the semi circles) but begin with a piece of A4 than is trimmed down 2mm on a long and a short side.  This allows the base to nest within the lid.  If using thicker card, you might need to make this 3mm.


Now the card itself is determined by the size of the box base,a tad smaller just so that it can be put into, and taken out of the box quite easily.  As my sides were only 1 cm, this gave me a card size of 18.5 x 27.3 cms.  The base is completely flat, but I scored the front 1.5 cms in from the spine edge (to allow it to open easily.
I decorated all my card, printed and decorated my inside sheets, then clipped all the layers together, to make sure they lined up before I punched some holes along the spine.  The inside layers were also scored 1.5 cms at the spine edge.  I spaced my holes approx 2 cms apart, starting in the centre.


Because I intended tying a bow in the centre, that's where I began.  I did a running stitch with narrow chiffon ribbon, to one end.


I then came back up, making a back stitch, back to where I began at the centre.  I continued with a running stitch to the opposite end, and a back stitch to the centre.


This is what it should now look like.


And I tied a bow, as I had intended.


This is the finished card and box. 


 ....And a close up. I stamped and heat embossed in silver.  For the writing I used an embossing pen.  I wrote what I wanted onto some parchment, and when I was satisfied, I wrote over the letters on the parchment reverse, then transferred it to my card by writing over the letters on the parchment front again.  I was left with faint pencil letters on my card, which I wrote over using the embssing pen and covered in silver powder which covered any pencil.  With the addition of some pearl paper flowers, slightly shaped/rounded with a ball tool, some pearls and mini gemstones (from a nail art kit), and I was pleased with the result.


 These are the inside pages.
I finished by wrapping in two lengths of silver tissue paper, stamping and embossing on the box lid, and tying with the same lilac ribbon.


Christine