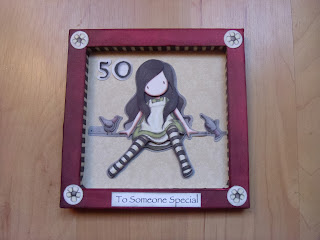
I seem to have a few 50th birthday's coming up, so I decided to make this framed card and share it with you. I first made these style of cards a few years ago, and I cannot remember where the idea came from, but it isn't mine.
For the frame:
Cut an 18 cms square piece of card and from the outer edge working towards the centre, score at 1 cms; 2 cms; 3.5 cms; 4.5 cms & 6 cms. Repeat for all four sides.
The blocked red sections marked on the diagram to the left are the sections to be removed, and the additional red lines are CUT lines. You will also notice in the lower right corner, I have marked (in black) further diagonal cuts that make the tabs to hold the frame. This should be done for all four corners.
When you have removed the specified sections, made the additional cut lines and sharpened all your score lines, you should have something that looks like the photo on the left.
When you fasten it into the 'frame' shape, it should look something like this underneath.
And like this on the upper surface.
The base card is approximately a 15 cms/6 inch square. I cut a 15 cms square mat for the front of the card; a 15 cms square frame that is 1.5 cms deep (keep the cut out), and some 1 cms strips to cover the frame edges, both inside and out.
This is when the papers have been fixed to cover the frame.

And the front of the card waiting for the focal point and frame adding.
I also added the smaller square off cut from the centre of the frame above....waste nothing.
And to complete, I added a decoupaged figure, 50, a few corners and a greeting. Edges can be inked if you wish, or run the chisel edge of a ProMarker (or similar) around the frame, to disguise gaps if you have them.
Christine


No comments:
Post a Comment