Monday, 25 May 2015

MILK CARTON GIFT BOXES

I was asked a short time ago how to make the milk carton style gift box.  It is a natty box that allows you to fill, and refill it, without spoiling the exterior.  I am all for recycling, so providing you tie it up with ribbon, or hold it together with a bull dog clip, it can easily be fastened and unfastened multiple times.

The basic principle of the carton is to divide your paper or card into 3 rows and 4 columns with an additional allowance for a tab to enable you to seal the side.  The layout shown is using an A4, but any side could work as long as you divide it up in the same manor.  For a taller box, just make the central row much deeper (using a 12 x 12 sheet and trim accordingly) An A4 divides neatly into 7cms square and the excess after 28 cms makes a good allowance for the tab.  The columns need to be cut to the 2 scored rows, shown in the bold solid lines on the diagram (the dashed lines are only scored)

To decorate, you might find it easier do this flat.  Only decorate the areas shown, as the rest will be folded in and will not be seen.  Alternatively use a double sided heavy weight paper, or stamp a design onto a coloured card.  Using double sided tape, or glue, seal the tab on the right to the side of panel on the left. You should now have the start of a square cylinder.  Fold in the two opposite plain panels at the bottom and seal together, then seal the third plain panel onto these, and finally the decorated panel.  Your base should be sealed properly to ensure the safety of any gift you put inside.  To close the top, fold in the two plain panels but do not seal them, then pinch the opposite two sides together at the top and use ribbon or a clip to hold it closed.  Boxes can be made as fancy or as plain as you like.  Shredded tissue paper inside will add an extra luxurious quality.

The taller boxes pictured below are made from a piece of 12 " sheet trimmed to 24 cms, making the rows 7 cms, 10 cms (middle section) and 7 cms.  Coloumns remian at 7cms wide.  
The mini carton was made from an A4 trimmed to 15 cms x 21 cms, scored into 12 equal squares of 5 cms, with the extra 1 cms for the tab.


Happy crafting  !!
Christine

Monday, 18 May 2015

BLUEBELLS & BOKEH

Walking last week with the dogs in the woods in our village, we were still able to catch the beauty of the bluebells.  It's been quite a good year for them, although the best I've seen was about 4 years ago, when they were a real blaze of glory.  When thinking about what I would blog this week, I wanted to share a few of the photos we took on the walk, and to say that inspiration is all around us if only we look :)

Also this week, I pinned on my 'Inky' Pinterest board an idea called stamping bokeh technique.  The link is here https://uk.pinterest.com/pin/381961612123342594/
It appealed to me, perhaps because I used to do a similar style of stamping with the children when I was nursery nursing.  You will notice that I have used acrylic paints, whereas the Pinterest link shows pigment ink pads.  I have however, still used a rubber tipped pencil to create a similar effect.  For all the horticulturists among us, I realise the card I have produced stamping with this technique looks more like a lupin and nothing like a bluebell.  But it was the bluebells that started the train of thought that made me arrive at this example.

With the schools holidays looming, perhaps this might be something you try with your children or grandchildren.  You don't need expensive or unusual resources, just a rubber tipped pencil to transfer your chosen colour medium (acrylic paint, ink pads etc), and I also used an old credit card (an expired  AA membership) to make the stalks, dipping the edge in the colour and dragging it down the card.  I also picked up the unused acrylic paint that I had put on my palette (an old CD) on an old toothbrush, and rubbing the bristles with my thumb, finely splattered the colour to speckle the stark white background.  When it is dry, simply mat onto some complimentary colours, add a bow to create a tied spray look and perhaps a few other embellishments.


Have a go, but more importantly, have fun !!!

Christine

Monday, 11 May 2015

Mixed Media Tissue Wrap


I really fancied a bit of messy art this week.  You know when you just get that urge, it has to be satisfied.  

I began by stamping my plain tag with a music score stamp across the most of it, and a swirl stamp, just off the edges using a black dye based ink.  After building up other layers, it can be seen subtly in the background.  I then decided to add some 3D relief.  Using a scrap of  Dutch grey board, I cut out a heart and glued it towards the bottom of the tag.  Then to give it more texture, I covered the whole of the tag in a thin layer of PVA glue, screwed up some tissue paper and added it to the tag.  I made sure I firmly pressed around the heart to define the shape, and pushed creases as I went along, with my finger tips.  This is soooooo satisfying.  Leave it to dry thoroughly.

When the tissue had dried, I removed any excess tissue by trimming around the edge of the tag.  I then chose 3  acrylic paints (light and shocking pink, pale blue), and using a wet wipe to apply, I randomly rubbed in small amounts of the paint, starting with the lightest colour first, until I was happy with the finish.  This really highlights the wrinkles in the tissue wrap, creating a wonderful texture.  Again, this needs to be left to dry.  If you use a heat tool, it could dry out the glue too much and the tissue might fall away....so be patient.

I then over stamped, a few random words, using a black dye ink.  An image or a verse would work equally as well, as you are only adding interest to catch the eye.  I then added a few accents to finish it off - gemstones, flower eyelets and a die cut of a treble clef, simply because I had started with a music score stamp, but again, this could be anything.  You are simply creating layers, textures, accents, and therefore interest.  You could try glitter, brads, cogs or other metal embellishments, or simply collage other cut outs.  I used Frayed Burlap Distress ink to 'age' the edges, but this is optional.  A little chiffon ribbon threaded through the top completed the tag, ready to mount on a card.  

Well that was therapeutic.....so as always, relax and have some fun !!!!

Christine

Monday, 4 May 2015

MINI WALLET ALBUM


Using 2 sheets of A4 card the same colour, place the first sheet portrait view onto a score board and score at 8.5 cms.  Rotate 1/4 turn anticlockwise and score at 1.5 cms, 13.5 cms, 26 cms and 26.5 cms.  Remove sections shown in the photo to the left.   Add tape to the left edge, but avoid the tab.


Now take the second sheet and score again, portrait at 8.5 cms, rotate 1/4 turn anticlockwise.  Score  at 12.5 cms, 13 cms, 25.5 cms and 26 cms.  Again cut away the excess as shown in the photo on the left.  You will notice the upper right has been cut into a shape, this can be done using a die, or simply use the curve of a plate as a guide.  Also trim another 1/2 cm down the already cut length of the inner side, on the lower half.

Attach the two pieces together, then crease all the scored lines using a bone folder.  Fold the bottom pockets up, but don't fix the side tab until you've decorated .... it just makes it much easier to manage.  The album should neatly fold in from the right hand side. 


I fastened mine with a simple button and some sheering elastic, but you could make a coordinating belly band or fasten up with a length of ribbon.  I chose to use the Graphic 45 Mother Goose collection.  I could tell you that I love this collection, but the truth is I love all their collections as they are so detailed and are of an excellent quality which makes working with them such a pleasure.


I haven't actually stuck those grey photo/journal mats down yet, as I haven't quite made my mind up what I am going to do with them.  They were however, the waste discarded from the first two steps above, so I simply trimmed them and will leave them with the mini album, until I am ready to finish it for a particular person.

Here are some of the pictures of the inside, with the lower pockets now glued down to seal the right hand side of them.


Monday, 27 April 2015

FANCY FOLDS 2 - FOUR SQUARE


 As the title suggests, this project is made from 4 squares.  As long as they are equal sized squares, you can do this in any size.  For the purpose of this project, I used four 6" squares.  These can be cut from from a 12" piece, from two A4 sheets (slightly less than 6"), or as I did, from a 6" paper pad.  I used double sided heavyweight papers, but as you cover the joins, double sided isn't necessary.

 
 Begin by scoring and folding each piece in half ***if you have a direction/a right way up, on patterned paper, you will need to do two vertically and two horizontally in half.  Your first join will be attaching what will be the 'top' fold out section, to the upper right quarter of the 'left fold out section'.  Use a craft mat or similar, as a guide to where the quarter section actually is.  Alternatively, you may feel more confident if you lightly mark this section using a  pencil and a ruler.  Then fix the 'right fold out section' to the lower right quarter of the previous paper.  You are in effect overlapping/weaving the papers together. The photo on the left shows the last section where I have flipped the paper over, simply to demonstrate that this last piece needs to be joined to the lower left of the third paper, then attached underneath the first paper.  Now to decorate.


Close up by overlapping each quarter, tucking the last one in.....similar to how you would close a box up if you didn't want to completely seal it with tape.  It is important to decorate the front whilst it is closed, as the folding process can alter the position of margins.  I cropped my photos to 6 cms squares, and matted on complimentary coloured mats of 6.5 cms squares.  I positioned them approximately 1/4" from the two outer edges, thus having a frame all the way around when all four photos were placed.  You could use some or all of the squares for wording or numbers e.g 18th, 50th etc.

For the inside I used one large photo on a mat and placed it centrally.  I printed a verse and split it between the top and bottom sections, and used some scraps for a little bunting at the sides.  You could add more photos, especially if it is for a special birthday or anniversary.  Looking at how people have changed as years have passed can lead to a wealth of  chatter and amusement as memories are relived.


Have fun and more importantly...have a go.  Happy Crafting !!
Christine

Monday, 20 April 2015

PYRAMID BOX

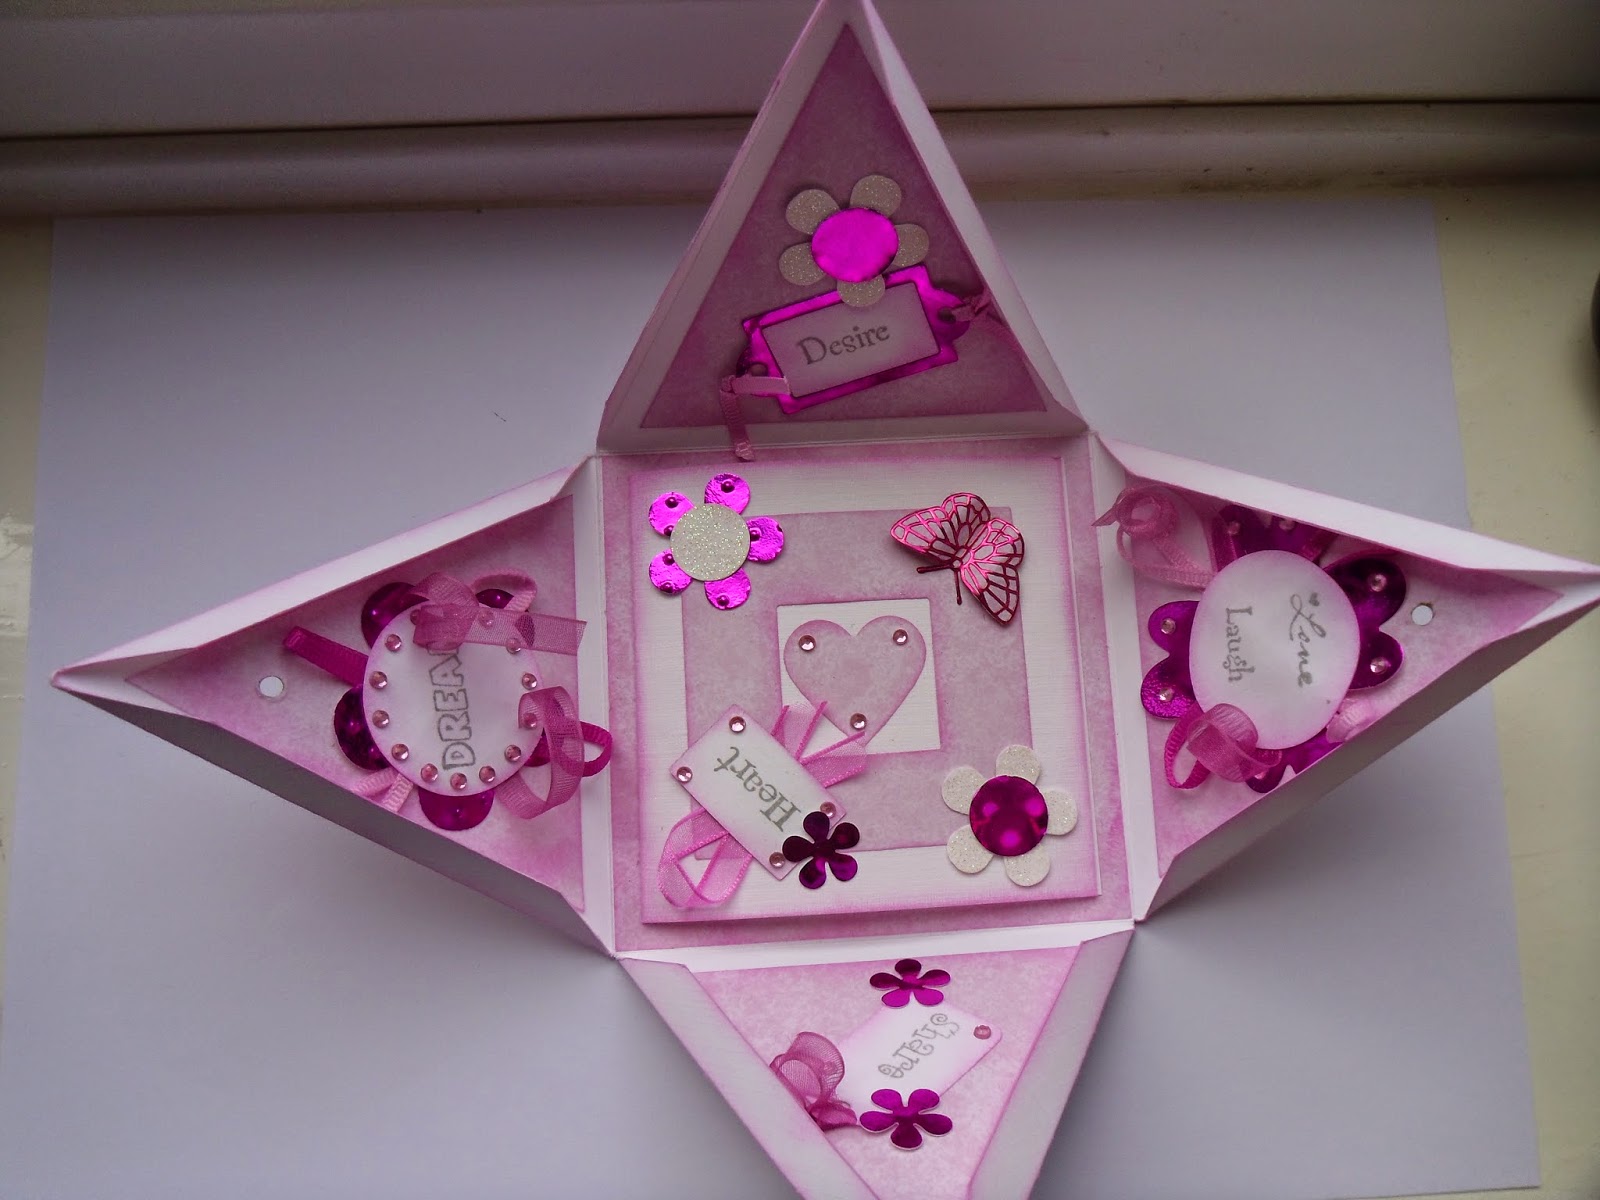
Using a sheet of 12 x 12" card, score into 9 equal sections, by scoring at 4" and 8" intervals.  Then mark the mid point of each side and score up to this point, as shown in the diagram.  You will then need to measure and mark a 1 cm width around all these last diagonal score lines.  This will form your cutting line.  Taper the cuts at the top points to enable you to fold your box up without excess bulk.

The close, you will need a 9 cms square of card (or 2 glued together to give extra strength), with a centre section cut out, approximately 4 cm square. On two opposite triangular sides of the box, you will need to make a small hole, approximately 3.5 - 4 cms down from the top point, to enable you to slot a wooden kebab skewer through.  I did all my decorations before I made these holes.  I cut the skewer down to a length I felt was reasonable, with some overhang either side.  I sanded both ends so they wouldn't cause injury, and decorated one end with tied ribbons and beads, just to add interest.

The photos show how I have decorated mine.  I decided on a pink theme, but an ecclectic mix of colours would work equally as well.  The square used to hold the box closed also needs decorating, but avoid anything overhanging the cut out centre square, or it will cause an obstruction.

I'm not a huge 'peel off' fan, but sometimes they have a place.  The butterflies perfectly matched one of the metallic pink cards I had chosen to use for some of my flowers.  I attached them to the pale pink paper, and cut around them, then shaped their wings a little to give them dimension.  As I was using a pale pink paper on white card, I inked all the edges so the mats would 'pop' rather than simply blending into the background.  If you use strong contrasting           paper/card, you may find there is no need to ink. 

The box could be used to hold a gift, or, as I have done, hold a card in its base.

When you've had a go at this particular box, why not try different sized and shaped pyramids.  You still need to use the initial principle of 9 squares, but your first score lines to produce these 9 squares, will vary.  So for example, if you score at 5" and 7", you will have a taller box with a smaller base, or 3" and 9", a shorter box with a larger base.  As long as you score an equal distance from your mid point along each side, everything will fall into place.  Try an 8" or 6" square of card to produce even smaller boxes.

When I was in High School,  I had a brilliant maths teacher who had us making these around Christmas time, although the 1 cms flaps were completely glued up rather than using a skewer to secure.  We would make four pyramids and a cube for the centre, to stick these pyramids to, making fabulous star shaped Christmas ornaments. 

Have fun !
Christine.


Monday, 13 April 2015


 FANCY FOLDS 1
For this particular card I used a plain sheet of 12" square thin card.  If it is too thick you will find it hard to manipulate into position once all the folds have been made.

1.  Faintly mark the centre with a cross - this will help to ensure that the next folds are even widths.
2.  Score at 6" and 9", both ways.  Using the centre cross as a guide, fold in (lining up with the cross) and crease with your finger.   If you do too strong creases at this stage, you can't adjust if needed, later on.  Quarter turn and repeat.
3.   Undo all the folds, then fold all four corners to the centre cross.  Again, only crease with your finger.  These diagonal folds need to be folded back on themselves, in the other direction, to allow extra flexibility in stage 4.
4.  Open out and lay flat on it's base. In the middle of each side you will notice a point where these diagonals have just been formed.  Push inwards towards the centre from all four directions, to form a neat square.  This is where you can make slight adjustments, then sharpen all creases with a bone folder.  As an optional extra, you can fold the top squares back on themselves to form triangles.  Your basic card is now complete and just needs decorating.
5.  On this particular card, I decided to use a border punch around all the edges.  All folds must be made before you do this.  I did this by opening it out to a 12 " square again, and taking my time, punched a border.  I did play about with various border punches or scraps of paper, to make sure the pattern, and corner turning, worked out for this particular size.
6.  To close, I made a simple 'wrap' style belly band, fastening it with a little ribbon and added a topper to draw your eye to the centre.  It just awaits a verse appropriate for the intended recipient


This card has been made from a good weight double sided paper.  You will notice that the top squares have not been folded back on themselves, or the edges punched, as I only intended this to be 'an envelope' for the card inside.

Keep it as simple as you like, but have a go !!

Happy crafting everyone

Christine